From Beginner to Blogger: My $3 Website Built in 3 Days with AI
A complete guide to building a website in 3 days for $3 with AI. Learn Hugo, Vercel deployment, Cloudflare DNS, and domain setup, tailored for beginners with no coding experience.
- 11 min read
Recently, Vibe Coding has been trending.
For someone with no programming background, is it possible to create simple projects with the help of AI tools?
Driven by a desire to document my life and share my interests, I decided to try building a personal website.
To my surprise, with AI assistance, I managed to launch my website in just 3 days for only $3!
This article details my journey, sharing how a complete beginner can leverage AI tools to achieve this goal.
Whether you want to start a blog, showcase your work, or learn a new skill, I hope my experience inspires you.
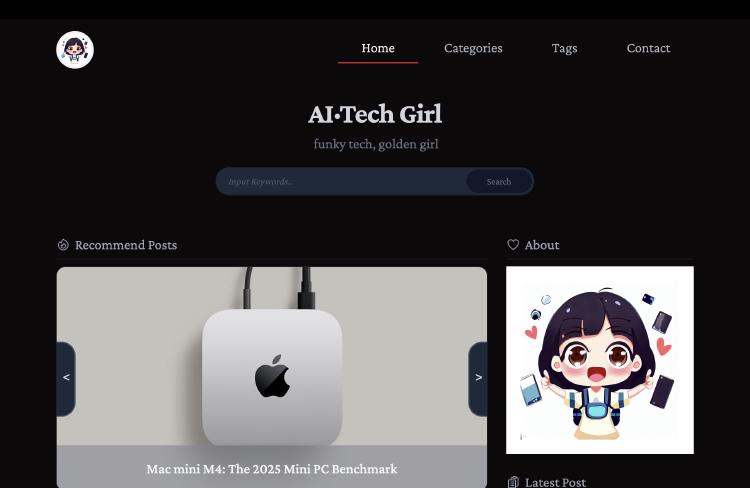
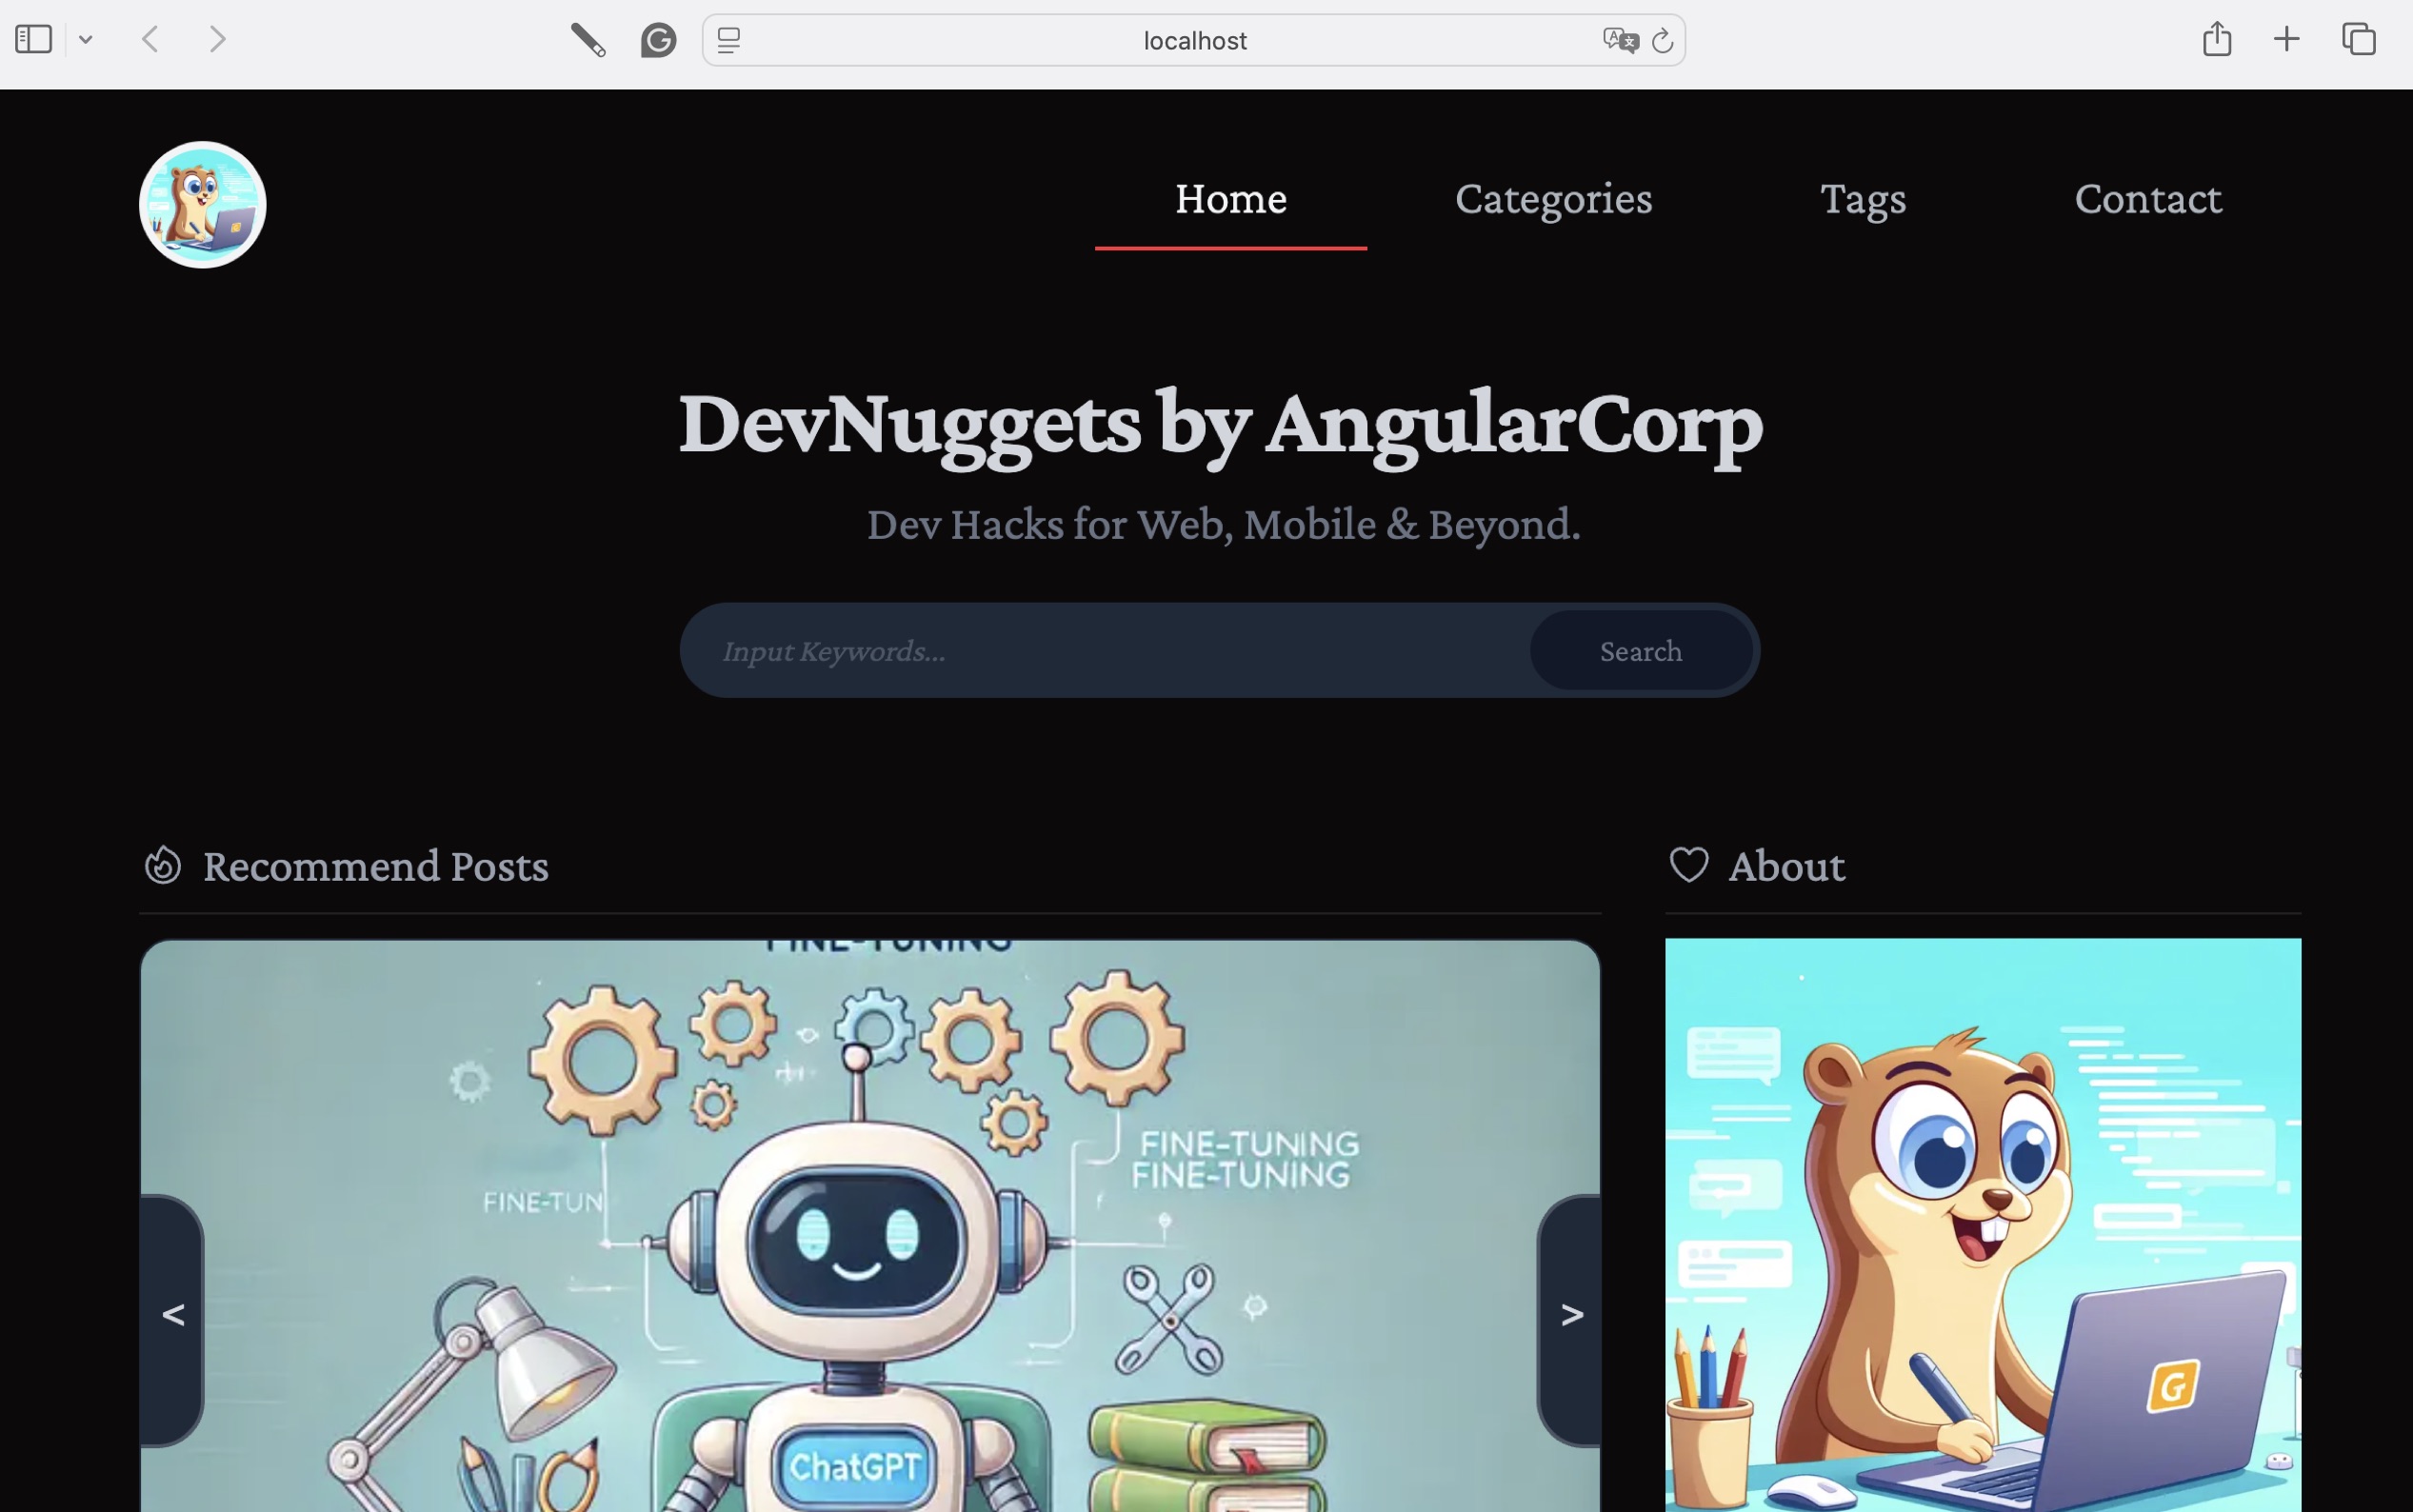
1. Website Results
Let’s start with the final outcome: my website is live!
I used a Hugo + GitHub + Vercel + Cloudflare stack, all on free plans, with the only cost being about $3 for a domain name.
The entire process was guided by AI. I described my needs to Grok in plain language, and it provided solutions, code, and step-by-step instructions. Everything worked, and my site went live under Grok’s guidance.
(This is the beta version of my site, with content and features still in progress.)
Building a website can be daunting due to technical complexity and costs, but AI makes it simple.
AI tools not only help you quickly grasp basics and generate code but also recommend beginner-friendly tools and workflows.
However, AI is just a tool—you still need to learn and apply it to produce results.
Q: Can a beginner build a website with AI? A: My experience says yes! Q: Is it hard? A: It’s easy for some, tough for others. Q: …Explain… A: AI can provide plans, steps, and even code, but beginners may not understand what the code means. For example, when Grok taught me to create a Hugo site, I didn’t know what a “terminal” was or where to input commands. Terms like “mkdir~” or “cd~” were gibberish to me. For complete novices, it’s not just about how to do it but also what the code does and why.
With AI’s help, though, these hurdles can be overcome quickly.
As long as you’re willing to learn, it’s totally doable.
2. Day 1: Research and Planning
The first day was about laying the groundwork.
My goal was to understand the website-building process, identify necessary tools, and estimate costs.
With zero coding experience, I relied on AI as my “coding mentor.”
Defining Goals
I wanted to create a blog to share insights about cool tech products, with hopes of eventually turning it into a “one-person business.”
The site needed to support bilingual content (English and Chinese) to encourage consistent language practice.
It had to be simple, responsive (working well on both desktop and mobile), and built on a minimal budget.
AI-Powered Research
I used Grok as my AI tool to explore the basics of website creation.
Grok explained that static websites are ideal for beginners due to their simplicity, speed, and low hosting costs.
It recommended static site generators like Hugo and Jekyll, as well as free hosting platforms like Vercel and Netlify.
Through AI, I quickly grasped the workflow: plan → develop locally → write content → deploy → bind domain.
Choosing Tools
Based on Grok’s advice, I selected the following tools:
- Hugo: A lightweight, fast static site generator, perfect for blogs. It’s blazingly fast, has an active community, and offers plenty of themes and documentation. Hugo is beginner-friendly, requiring only simple commands and Markdown files to create a full website.
- GitHub: For version control and code storage, completely free. GitHub not only backs up my site’s code but also integrates with Vercel for automatic deployments. It’s a standard tool, manageable even for novices with basic commands.
- Vercel: A free hosting platform with one-click deployment. It auto-detects Hugo projects, optimizes performance (e.g., image compression, faster loading), and provides a free temporary domain. Vercel’s seamless GitHub integration makes deployment a breeze.
- Cloudflare: Offers DNS management and CDN services. Its free plan includes fast DNS resolution, CDN caching, DDoS protection, and SSL certificates, boosting site speed and security.
- VS Code: A free, powerful code editor with a rich plugin ecosystem for editing Markdown and code.
- iTerm: A macOS terminal tool, replacing the default Terminal. It’s sleek, supports split panes and themes, and makes running Hugo commands more efficient (I’m a Mac user).
I also explored alternatives like Jekyll, WordPress, and Netlify, but with Grok’s help, I confirmed that Hugo + GitHub + Vercel + Cloudflare was the best combo for quick setup and long-term maintenance.
Selecting a Hugo Theme
A good theme saves tons of design effort, so I chose one on day one.
I visited Hugo’s official theme site (https://themes.gohugo.io/), which offers hundreds of free themes. My goal was a clean, responsive, blog-friendly theme.
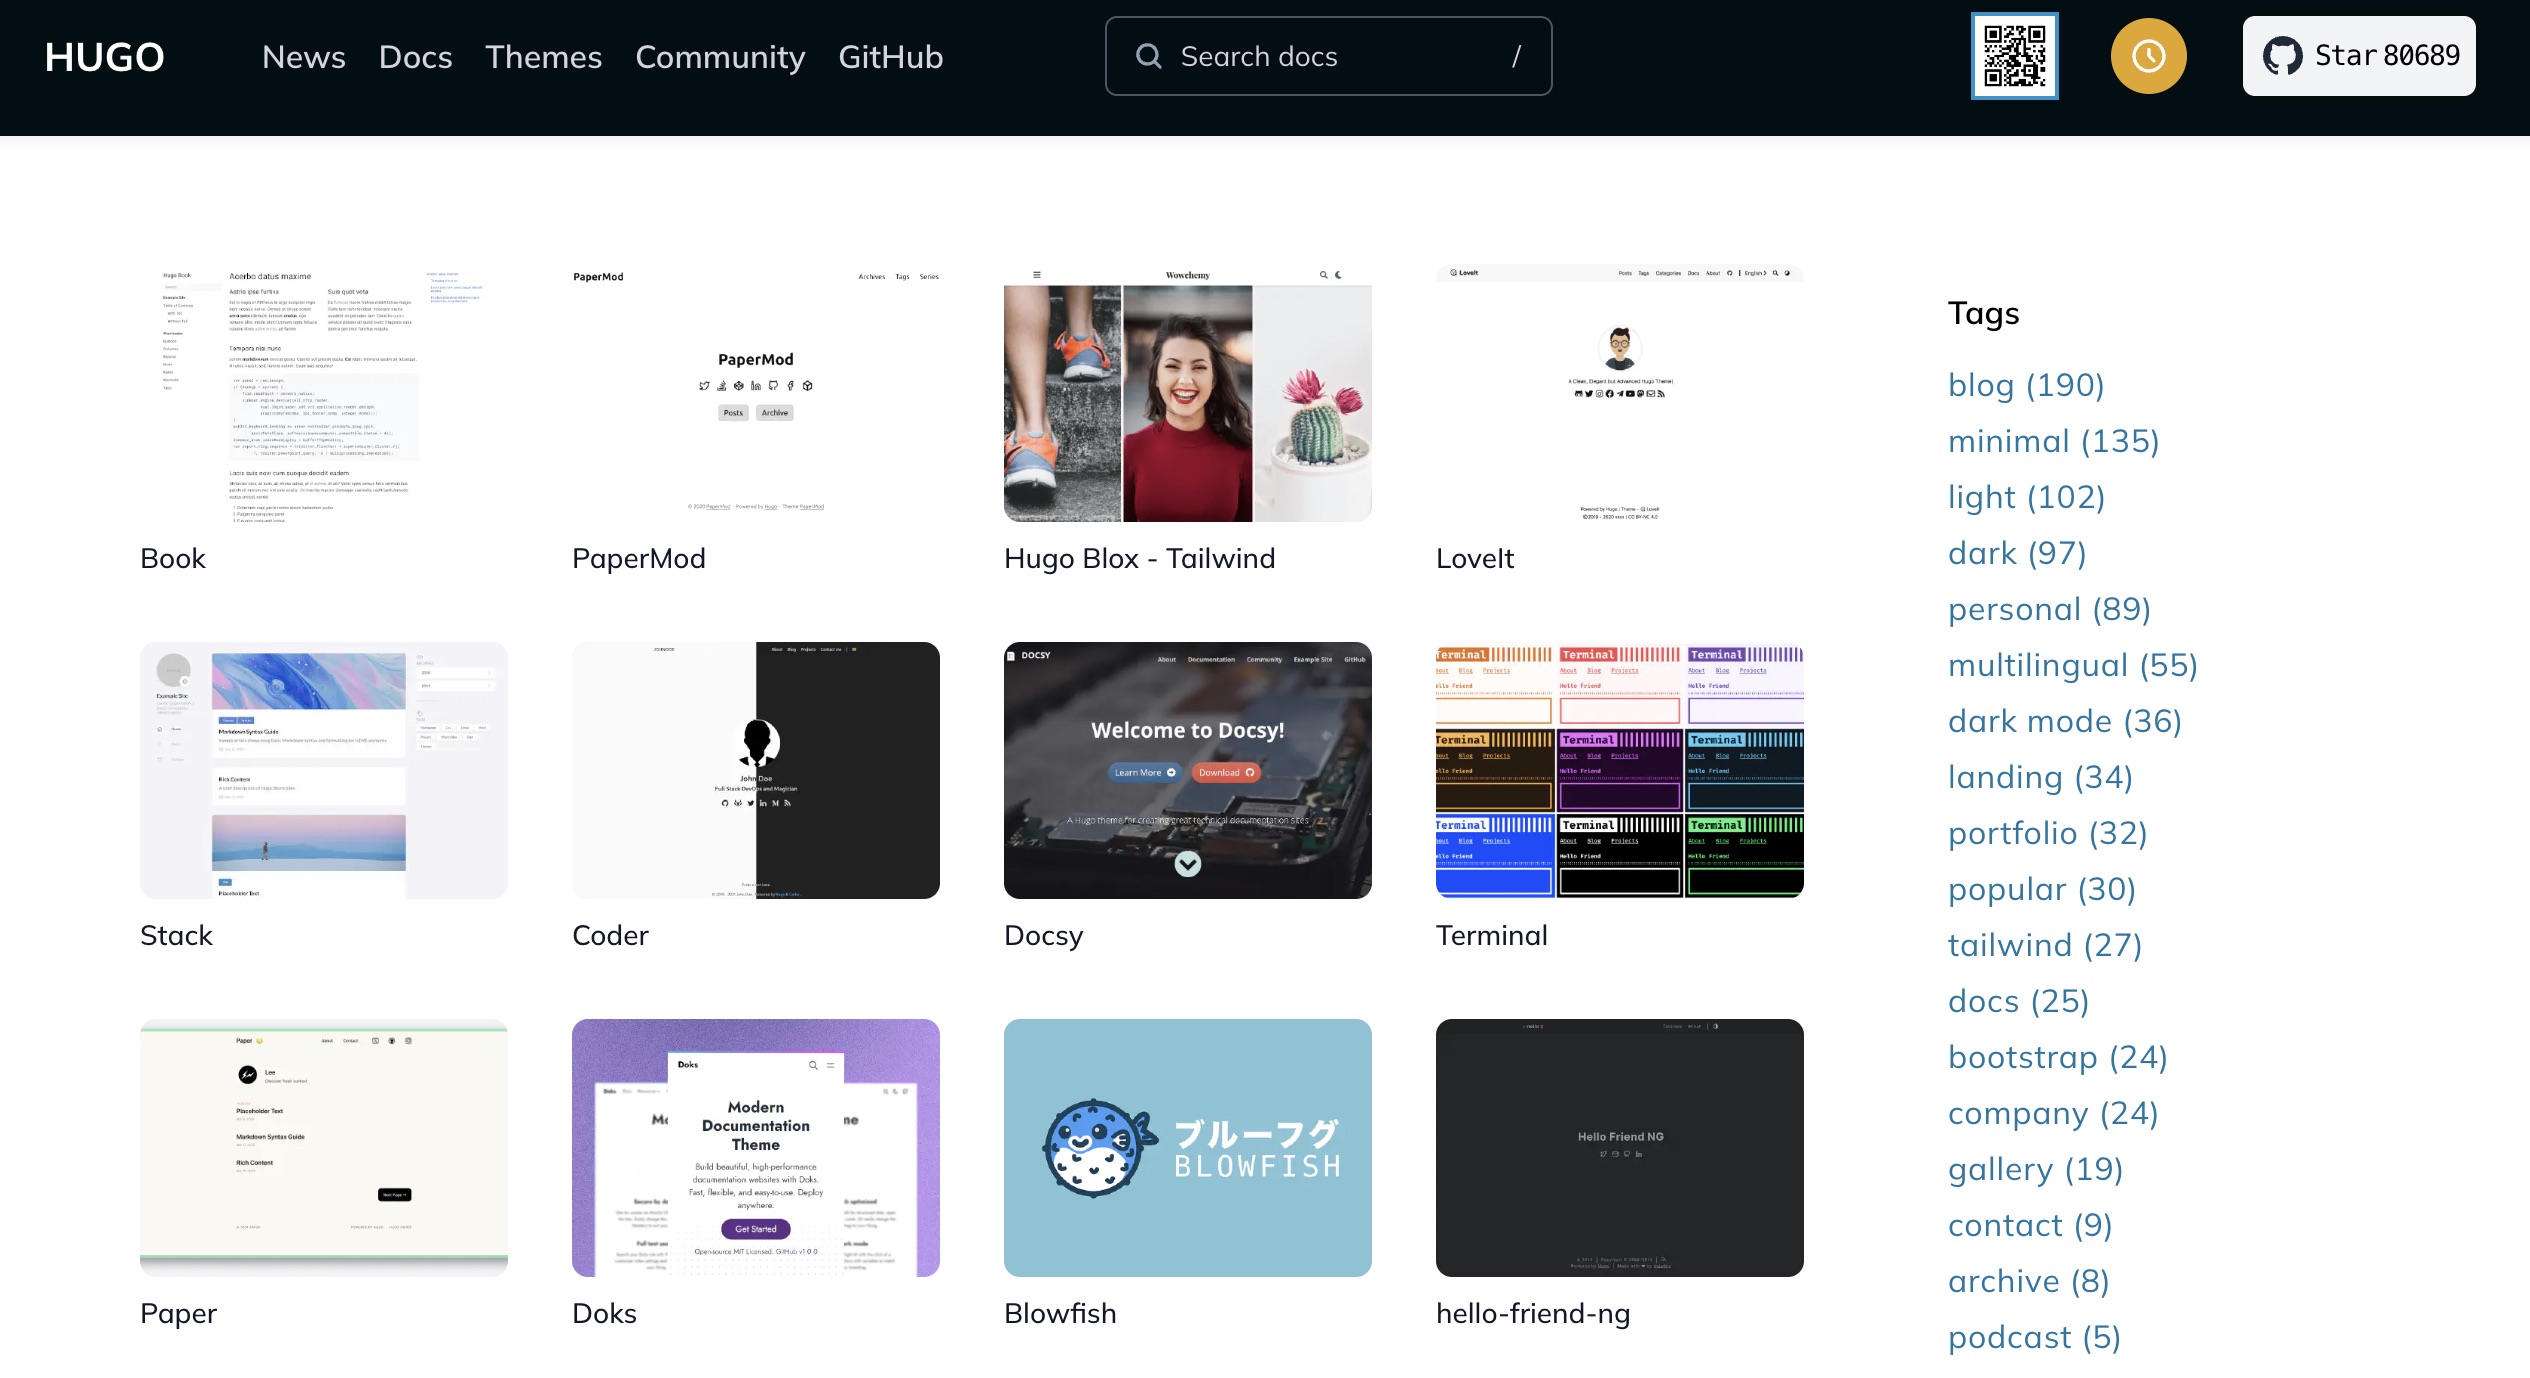
I settled on the Niello theme (https://themes.gohugo.io/themes/niello/).
During setup, I tested several themes but found some tricky to customize. Niello’s modern, Tailwind CSS-based design was perfect.
For beginners, I recommend picking a simple theme with minimal features for easier tweaks later. Also, choose themes with an MIT license for flexibility.
Cost Control
The only expense was a domain name. Without a custom domain, hosting on platforms like Vercel’s free subdomain could make the entire process free.
However, I wanted a custom domain for a professional look and to simplify integration with Google’s suite (e.g., Google Analytics, Search Console, AdSense) while boosting SEO.
Domain registrars include Aliyun, Tencent Cloud, GoDaddy, and Namecheap. After comparing prices and ease of use, I found Spaceship (under Namecheap) offered the cheapest .com domains. With a promo code, my domain cost about $3 for the first year, fitting my budget and integrating well with Vercel and Cloudflare.
Planning the Process
With AI’s insights, I outlined the next steps:
- Day 1: Research, learn the process, select tools.
- Day 2: Set up tools, register accounts, develop locally, write content, test.
- Day 3: Buy a domain, deploy, bind domain, launch.
3. Day 2: Environment Setup and Local Development
Day two was “hands-on day.”
After choosing tools, I installed software, registered accounts, and built the site locally.
I relied heavily on AI, especially for anything unclear, asking Grok for detailed steps and explanations.
Environment Setup
I clearly described my needs to Grok, and it provided step-by-step instructions.

Following its guidance, I installed:
- Homebrew: A macOS package manager, like an app store for software. It simplifies installing tools like Hugo with commands, no manual downloads needed.
- Hugo: A fast static site generator that turns Markdown files and themes into static HTML for publishing. It handles site structure, theme rendering, and local previews.
- Git: A version control tool for managing code and downloading themes (e.g., Niello from GitHub). Essential for publishing to GitHub Pages.
- Visual Studio Code: A text editor for editing Hugo’s config files (hugo.toml), Markdown articles (.md), and theme files.
- iTerm2: A sleek macOS terminal replacement for running Hugo and Git commands.
- Node.js: A JavaScript runtime, required by some Hugo themes (like Niello) for front-end tasks.
- npm: Node.js’s package manager, used to install Tailwind CSS and dependencies.
- Tailwind CSS: Niello uses Tailwind CSS for modern, responsive styling, installed via npm.
I added Markdown and Hugo plugins to VS Code for easier editing and debugging. The setup took under an hour, and Grok’s clear tutorials saved me from countless missteps.
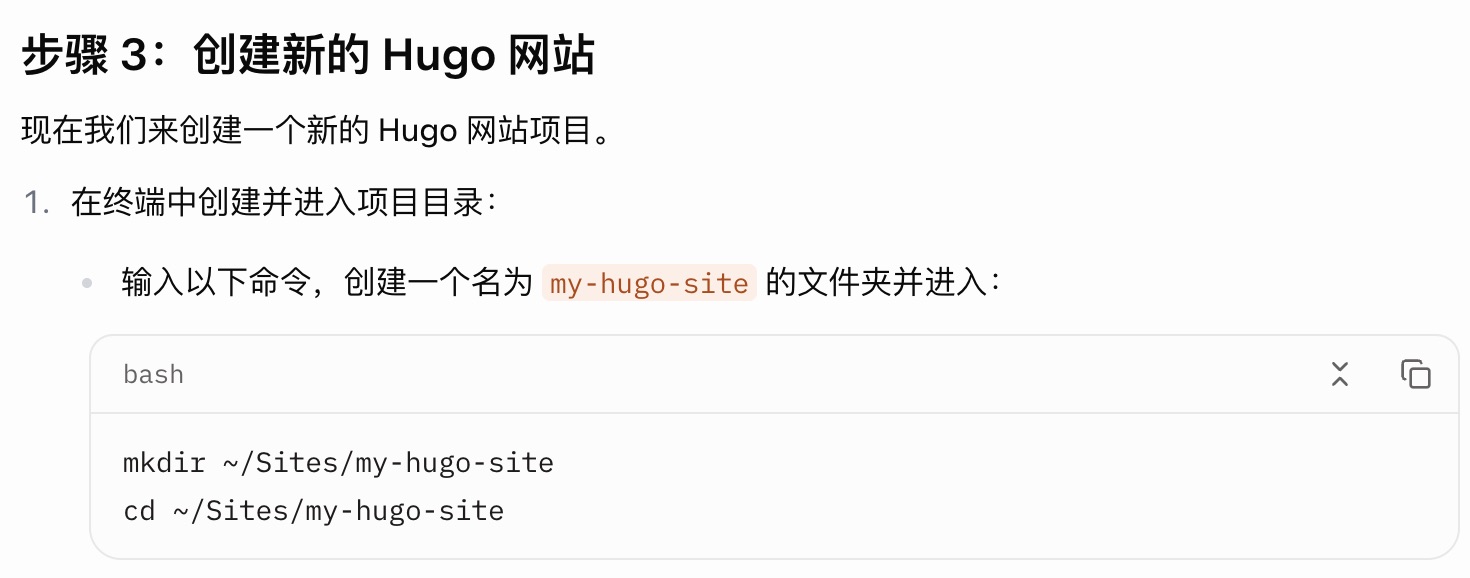
Creating a Hugo Project
- Install Hugo, Create Site:
I named my project “aitechgirl” and ran in iTerm2:
hugo new site aitechgirl
This created a Hugo project folder named “aitechgirl.” I navigated to it:
cd aitechgirl
- Set Up Theme (Niello):
Niello (https://themes.gohugo.io/themes/niello/) uses Tailwind CSS and is responsive. Per the theme’s docs, I cloned it from GitHub (https://github.com/itsmevjn/niello):
git submodule add https://github.com/itsmevjn/niello.git themes/niello
Copied the example config and content:
cp themes/niello/exampleSite/hugo.toml hugo.toml
cp -r themes/niello/exampleSite/content .
Edited hugo.toml to set the theme:
theme = "niello"
- Install Node.js Dependencies:
Niello requires Tailwind CSS, so I installed dependencies:
npm install
Ran the build script to generate styles:
npm run build
- Local Testing:
Started the server:
hugo server
Visited http://localhost:1313 in my browser. The Niello theme displayed a homepage, about page, and articles, with clear navigation and responsive design for phones and desktops.
Hugo Project Structure
The project generated a folder named “aitechgirl”
Initially, I was clueless about its contents, but after trial and error, I understood their roles.
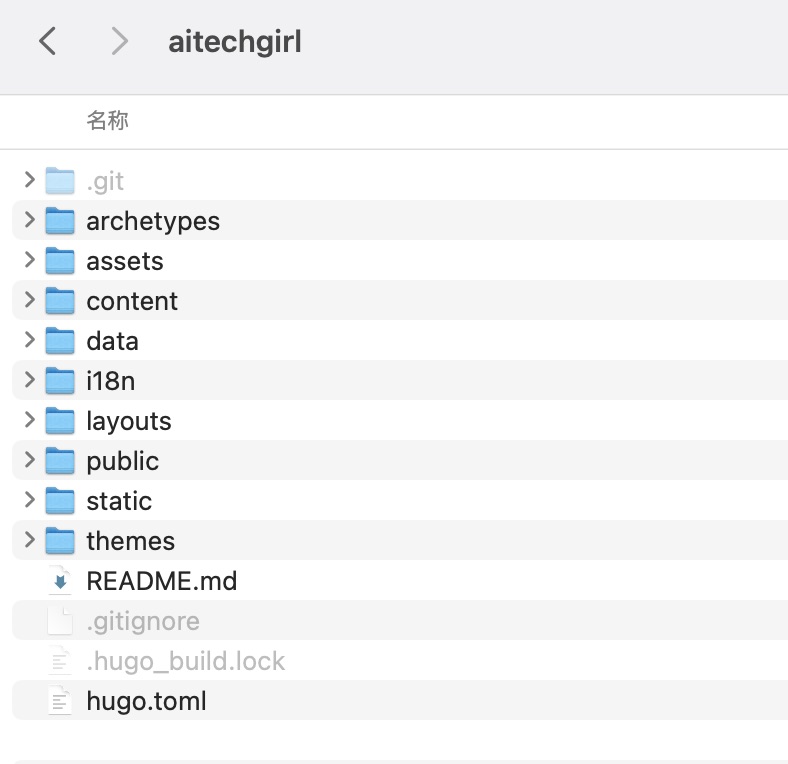
- Key Files/Folders and Their Roles:
- archetypes: Templates for new articles, defining default formats.
- content: Stores Markdown articles (e.g., “.md”).
- data: Holds data files (e.g., JSON or YAML).
- layouts: Custom templates (usually provided by the theme).
- public: Output folder for generated static site files.
- static: Stores images, CSS, JS, and other static assets.
- themes: Contains the Hugo theme (e.g., Niello).
- hugo.toml: Site configuration file, controlling settings.
Testing and Writing Content
I customized the site based on my goals and tested it with sample articles. Using VS Code, I opened the “aitechgirl” folder and edited files.
Configured site info in “hugo.toml”, with Grok’s sample as a guide, tweaking it to fit my needs:
title = "AI·Tech Girl"
[params]
  description = "Share interesting tech products, focus on one-person business."
[[menu.main]]
  name = "Home"
  url = "/"
[[menu.main]]
  name = "About"
  url = "/about/"
[[menu.main]]
  name = "Posts"
  url = "/posts/"
Created a new article at “content/posts/my-post.md”:
---
title: "My First Blog Post"
date: 2025-05-14
---
This is my first article!
Understanding Theme Formats
Each article starts with a Front Matter section, like this:
+++
title = 'Example1 Title - EN'
date = 2024-12-11T09:34:12+08:00
categories = ["Example 1 - EN"]
tags = ["eg1 - en"]
keywords = ["SEO", "Keywords", "Here"]
description = "SEO Description Here"
draft = false
+++
The Front Matter acts like an article’s “ID card,” defining its title, date, categories, tags, and more, controlling how it’s displayed and organized. Hugo uses this for generating pages, sorting content, and SEO.
Initially confused, I asked Grok to explain each field:
- title: Article title, shown on the page and browser tab.
- date: Creation date, used for sorting and display (e.g., “Posted on Dec 11, 2024”).
- categories: Groups articles (e.g., creates “/categories/example-1-en/” pages).
- tags: Labels for themes, enabling tag-based browsing (e.g., “/tags/eg1-en/”).
- keywords: SEO keywords for search engine indexing.
- description: Short summary for search results and social previews.
- draft: “false” means publish; “true” keeps it in preview mode.
- +++: Marks the Front Matter’s start/end in TOML format.
Beginners can stick to the default Front Matter and focus on content. Later, you can tweak images, layouts, or fonts by asking AI for solutions.
Account Registration
To prepare for deployment, I registered accounts on:
- GitHub (github.com): Created a free account and a repository named “aitechgirl” for code storage. Grok provided “git push” instructions.
- Vercel (vercel.com): Signed up with my GitHub account for one-click deployment. Vercel’s free plan supports small sites.
- Cloudflare (cloudflare.com): The registration process is simple, requiring only email verification and basic information. You can also register and add a domain on the third day.
By day two’s end, my local site was taking shape, and accounts were set for deployment.
4. Day 3: Deployment and Domain Binding
Day three was “sprint day” aiming to launch the site and bind a custom domain.
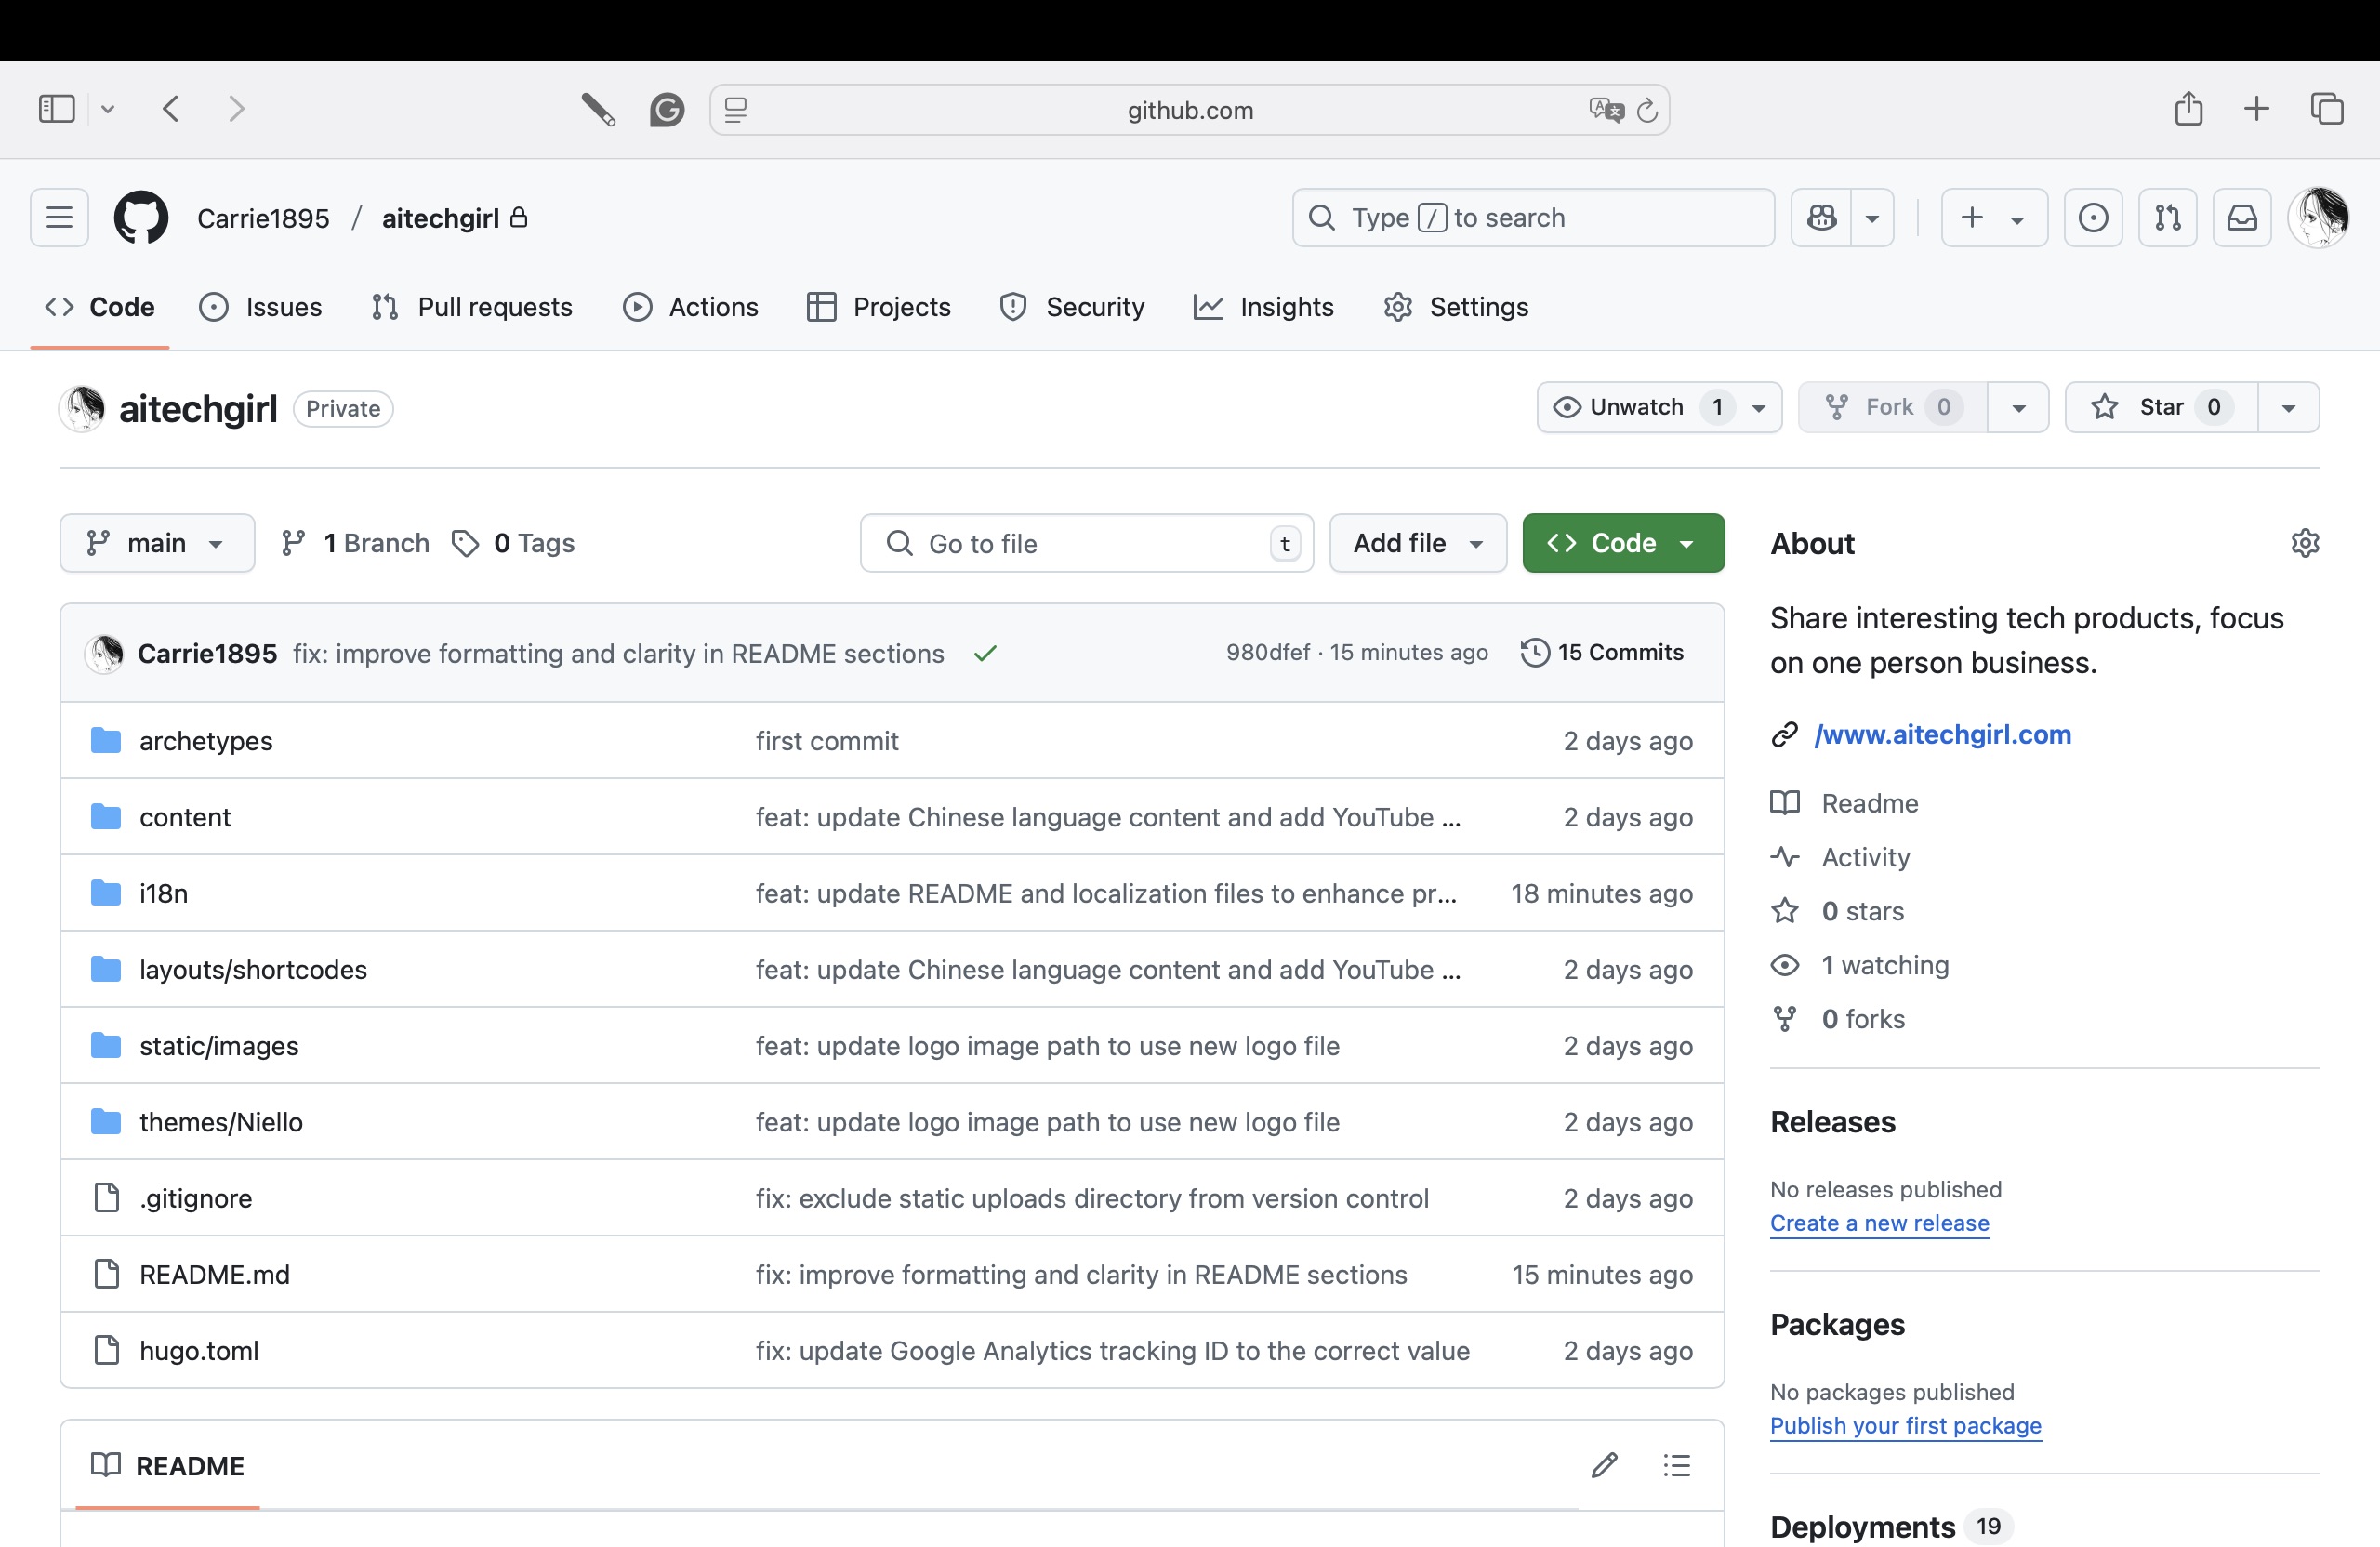
GitHub Hosting
I created a GitHub repository to host my Hugo project and link it to Vercel.
After setting up my “aitechgirl” repository on GitHub, I ran these commands in iTerm2 from the “aitechgirl” directory:
git init
git add .
git commit -m "Initial commit"
git remote add origin https://github.com/Carrie1895/aitechgirl.git
git push -u origin main
The push succeeded, and I verified the code on GitHub. This backed up my project and prepped it for Vercel deployment.
Vercel Deployment
I logged into vercel.com, clicked “New Project,” and selected my “aitechgirl” GitHub repository. Vercel auto-detected the Hugo project, and I confirmed:
- Framework Preset: Hugo
- Root Directory: Default (project root)
- Output Directory: “public” clicked “Deploy,” and within minutes, Vercel generated a temporary domain (e.g., aitechgirl.vercel.app). Visiting it, the site matched my local preview, with responsive design intact. No build errors—done in under 10 minutes!
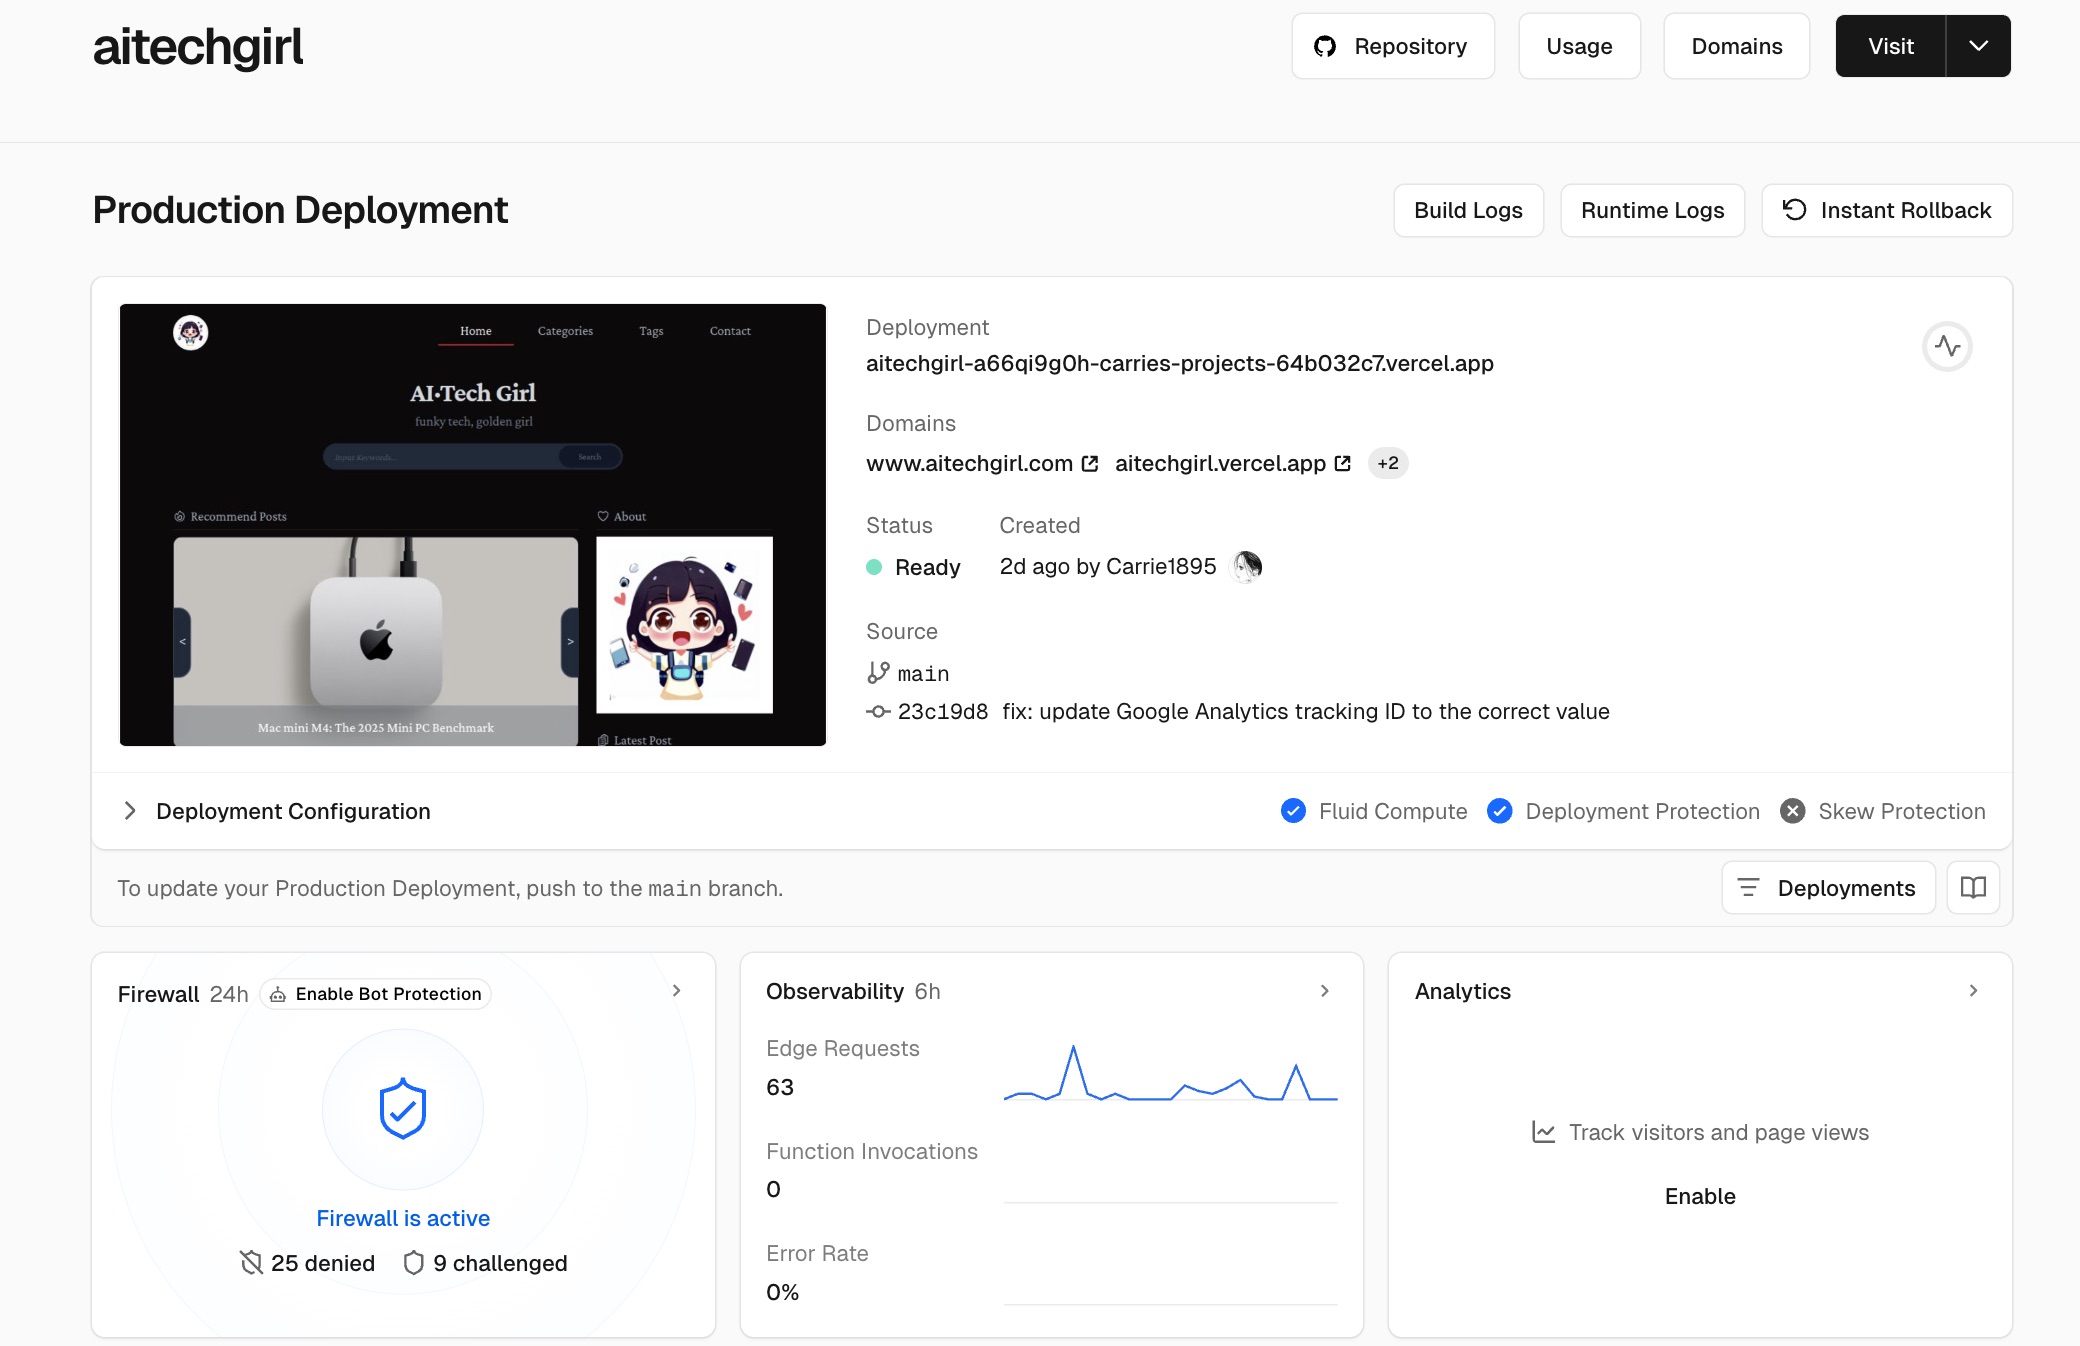
At this point, without a custom domain, the site was shareable as a portfolio, perfect for designers showcasing work.
Domain Purchase
For a professional look and long-term growth, I bought a custom domain.
After comparing prices, I chose Spaceship (spaceship.domains), where a .com domain cost less than $3 for the first year with a promo code.

I registered on Spaceship, added the domain to my cart, enabled free WHOIS privacy protection, and paid via credit card or Alipay. The domain status showed “Active” in Spaceship’s dashboard.
Domain Binding
To speed up access and enhance security, I used Cloudflare for DNS and CDN.
1. Add Domain to Cloudflare:
Logged into cloudflare.com, clicked “Add a Site,” entered “aitechgirl.com”, and continued. Cloudflare scanned for existing DNS records (none for my new domain) and provided two name servers (e.g., “dawn.ns.cloudflare.com”, “jim.ns.cloudflare.com”).
2. Update Name Servers:
In Spaceship’s domain management for “aitechgirl.com”, I changed the default name servers to Cloudflare’s. The update took effect in ~1 minute. Back in Cloudflare, I clicked “Done” to confirm.
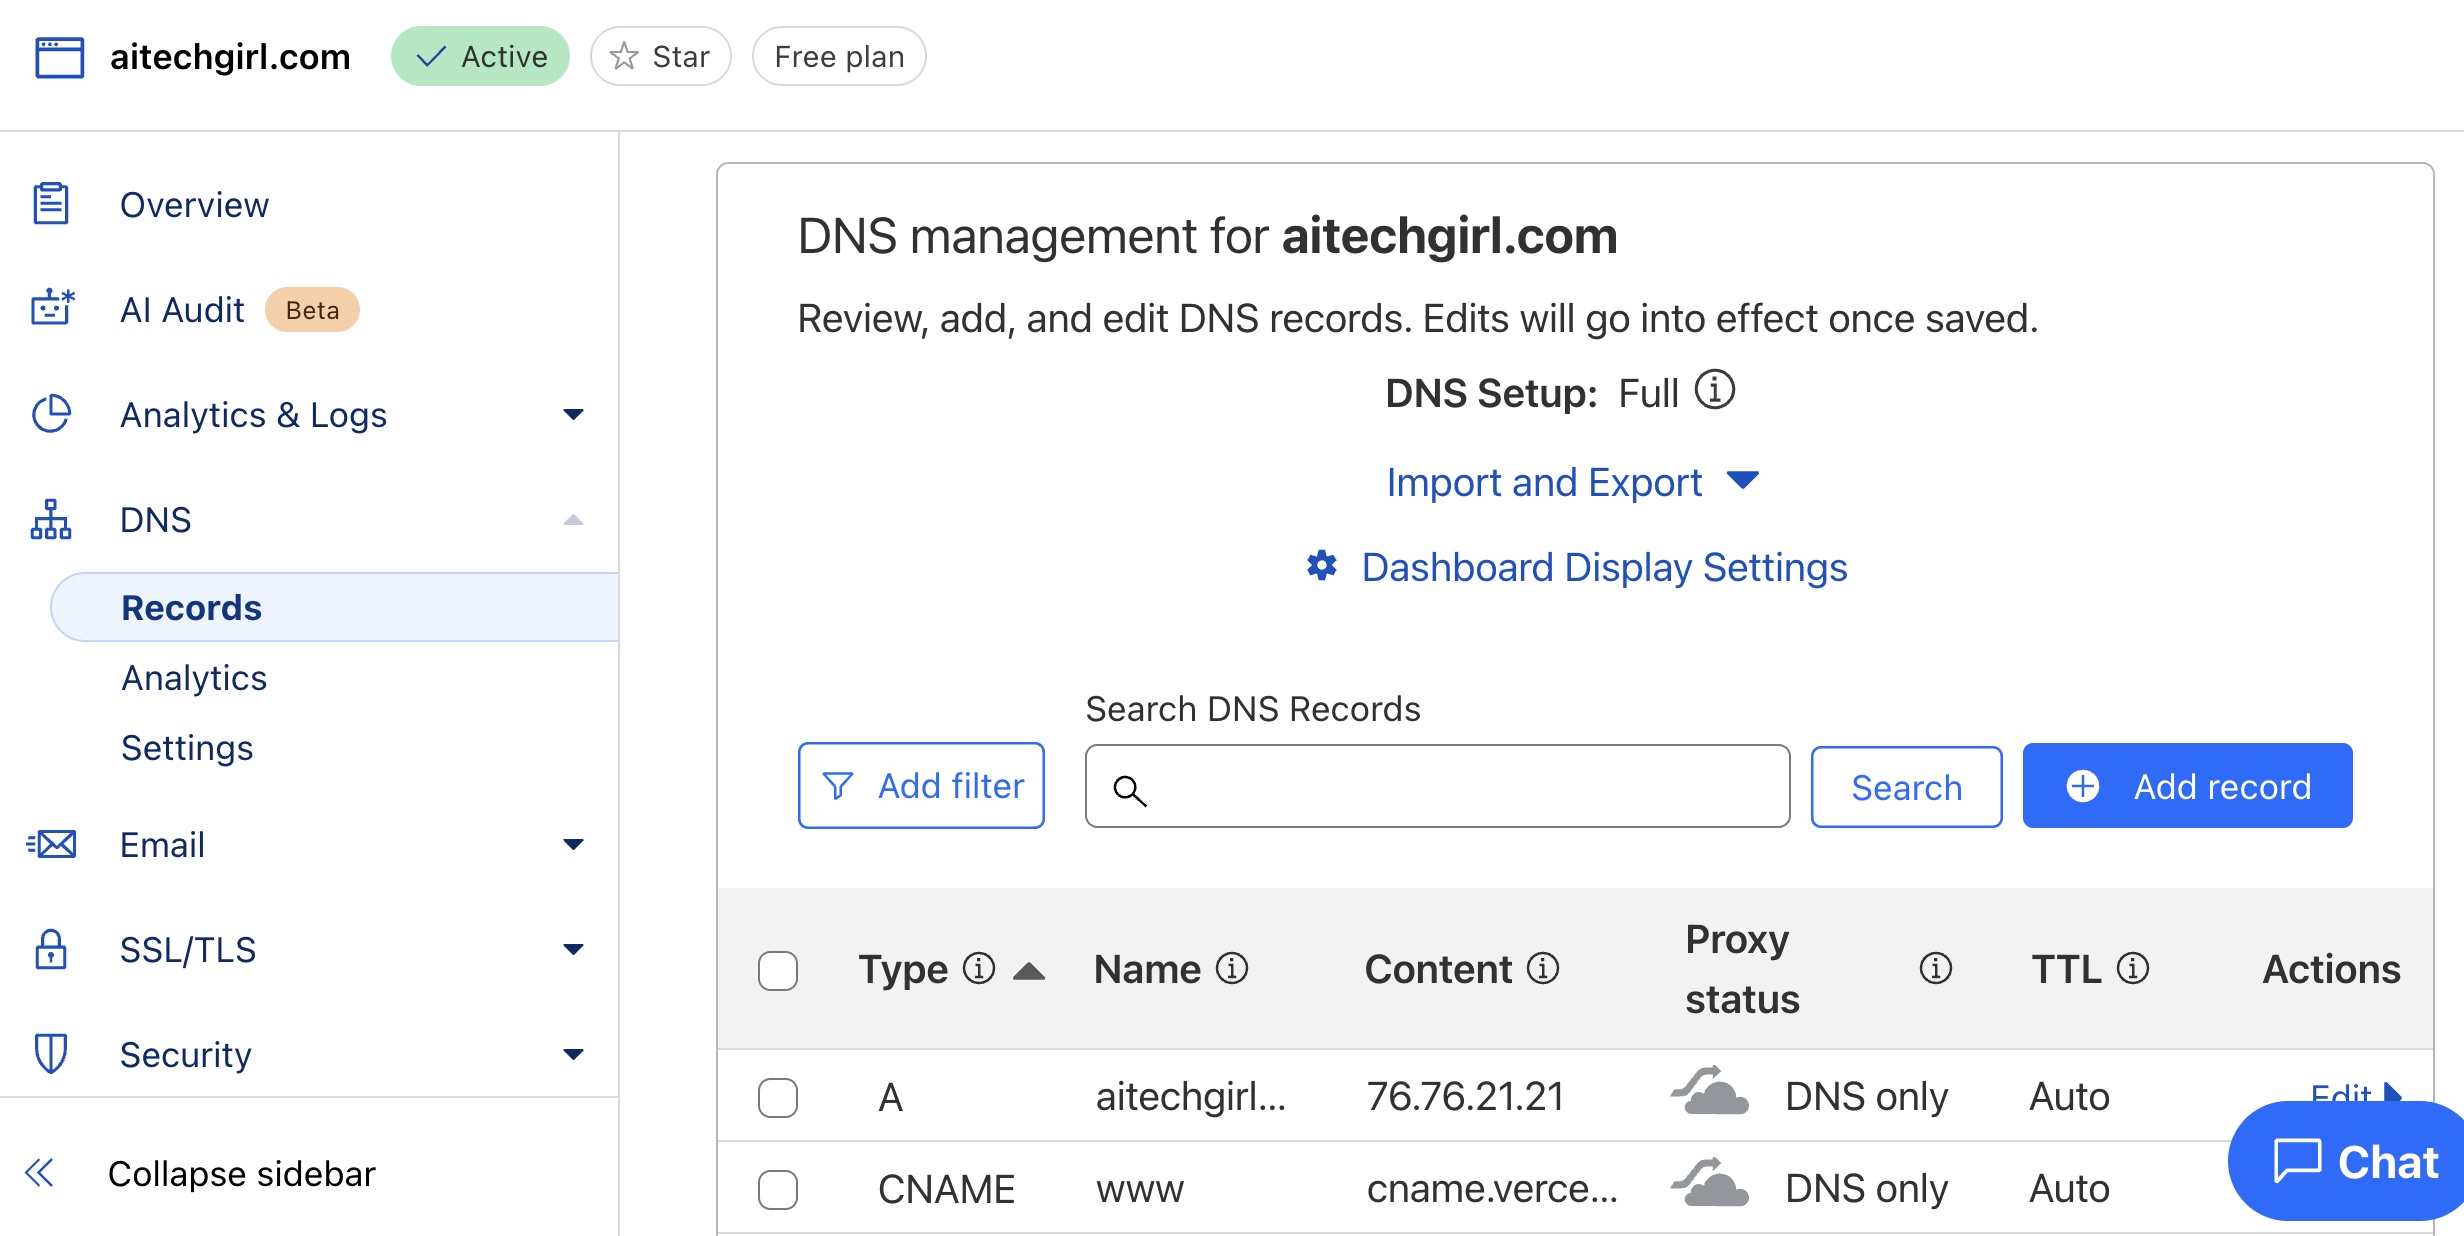
3. Configure DNS Records:
In Vercel, I added “aitechgirl.com” under “Settings > Domains,” which provided DNS records. I uploaded them to Cloudflare’s DNS dashboard. Alternatively, I manually added:
- Main Domain (aitechgirl.com):
- Type: A
- Name: @
- Target: 76.76.21.21 (Vercel’s IP)
- Proxy Status: Proxied
- TTL: Auto
- Subdomain (www.aitechgirl.com):
- Type: CNAME
- Name: www
- Target: cname.vercel-dns.com
- Proxy Status: Proxied
- TTL: Auto
Site Launch
After going live, I tested thoroughly.
Visiting “aitechgirl.com” on desktop and mobile, articles, images, navigation, and responsive layouts worked perfectly.
I now had my own website, ready to share my passions!
5. Lessons Learned
Building a website isn’t as hard as it seems!
With Grok’s help, I spent just $3 to create a custom-domain site from scratch, responsive and sleek, in three days.
While not lightning-fast due to my beginner status, this is achievable for anyone.
The real challenge is ongoing operation and maintenance.
Next, I plan to update my blog regularly, explore more AI-assisted projects, and share my hands-on experiences.
Follow along, and I hope my journey helps you!